
That sudden, sickening roll of the ankle—it’s a moment every active person dreads. One second you’re running, jumping, or simply walking on uneven ground, and the next yThat sudden, sickening roll of the ankle—it’s a moment every active person dreads. One second you’re running, jumping, or simply walking on uneven ground, and the next you’re hit with a sharp, debilitating pain. Ankle sprains are one of the most common injuries, but a “walk it off” approach can lead to chronic instability, recurring injuries, and long-term pain.
Many people search for how to tape a sprained ankle or how to wrap an ankle with athletic tape during the first days after an injury.
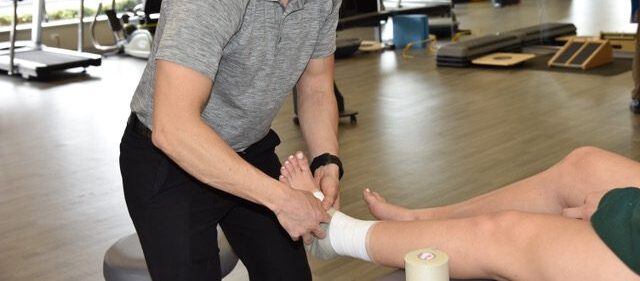
Proper care from the moment of injury is crucial for a fast, effective, and complete recovery. The team at IMPACT Physical Therapy & Sports Recovery in Champaign is here to help. This step-by-step athletic taping guide will walk you through the essential phases of sprained ankle taping, helping you get back on your feet safely. These steps follow the same principles used by athletic trainers when taping an inversion ankle sprain.
Why Athletic Taping Matters for Champaign Athletes
The Anterior Talofibular Ligament (ATFL) is the most commonly injured ligament in the ankle, typically from an “inversion” sprain where the foot rolls inward. The goal of this ankle taping technique is to provide support to the outside of the ankle, limit excessive inward rolling (inversion), and allow for safe, functional movement during recovery and return to activity. Learning correct tape direction and tension is key for anyone looking up step by step ankle taping instructions.
Step-by-Step Guide for Proper Ankle Taping Technique
What’s Needed:
- Non-elastic athletic tape (1.5 inches wide)
- Pre-wrap/under-wrap: A thin foam wrap to protect the skin.
- Adhesive spray (optional): Helps the tape and pre-wrap stick better.
- Scissors or a tape cutter
Step 1: Preparation and Positioning
- Clean and Dry the Ankle: Ensure the foot and ankle are clean, dry, and free of oils or lotions.
- Positioning is Key: Sit on a table or chair with your foot extended straight out. The ankle should be in a “neutral” position—not pointed up or down. A 90-degree angle between your foot and shin is ideal. This is the position you want to maintain throughout the athletic taping process. Proper positioning is one of the most important parts of how to tape a sprained ankle effectively.
Step 2: Apply Pre-Wrap
- To protect your skin from irritation, apply a single, even layer of pre-wrap.
- Start at the mid-foot (just behind the ball of your foot) and work your way up the ankle, finishing about 4-5 inches above the ankle bones.
- Overlap the pre-wrap by about half its width to ensure there are no gaps.
- Pre wrap helps prevent irritation and improves comfort during athletic ankle taping.
Step 3: Create Anchors
Anchors provide a solid base for the rest of the tape job.
- Proximal Anchor: Apply two strips of athletic tape directly over the pre-wrap at the top of your pre-wrap application (4-5 inches above the ankle). Overlap them by half. These should be snug, but not tight enough to constrict the calf muscle.
- Distal Anchor: Apply one strip of tape around your mid-foot. Be careful not to pull this strip too tight, as it can compress the bones of the foot.
Step 4: The First Stirrup (The Most Important Support Strip)
Stirrups prevent the ankle from rolling inward and directly support the injured ATFL.
- Start the tape on the inside of your top (proximal) anchor.
- Bring the tape straight down, go underneath the heel, and pull it up with moderate tension on the outside of the ankle.
- Finish by attaching the tape to the outside of the top anchor. This “U” shaped piece is your first and most crucial stirrup.
Step 5: Apply a Horseshoe (C-Strip)
- Start a new piece of tape on the inside of the ankle, just behind the ankle bone.
- Wrap it around the back of the heel and finish on the outside of the ankle, just behind the ankle bone. This helps secure the stirrup and supports the back of the ankle.
Step 6: Alternate Stirrups and Horseshoes
- Repeat the process, applying another stirrup directly over the first, slightly overlapping it towards the front or back.
- Follow it with another horseshoe, overlapping the first one slightly lower.
- Apply a total of three stirrups and three horseshoes, creating a strong, woven “basketweave” pattern that provides excellent stability.
Step 7: The Heel Lock
Heel locks add another layer of stability and are excellent for preventing the heel from shifting. This is a more advanced ankle taping technique.
- Start on the front of the ankle, at an angle.
- Bring the tape towards the inside of the heel, loop it around the back of the heel, and under the foot.
- Bring it back up across the front of the ankle.
- Repeat the process in the opposite direction to lock the other side of the heel.
Step 8: Closing Strips
- Once your support strips are in place, you need to lock them down.
- Starting from the bottom anchor at the mid-foot, apply strips of tape in a circular fashion, moving up the ankle until you cover all the support strips and reach the top anchor.
- This should look like you are re-applying the anchors. Overlap each strip by about half.
Final Checks:
- Circulation: Squeeze the toenails. The color should return within 2 seconds. If not, the tape is too tight and must be removed and reapplied.
- Comfort: The tape job should feel secure and supportive, but not painfully restrictive or pinching.
- Function: You should be able to walk, and while you will feel restricted, you should still have functional movement.
Removing the tape carefully is just as important. Use scissors or a tape cutter on the inside of the ankle where there is more natural padding to avoid cutting yourself. Always pull the tape back against the skin, not up and away from it, to minimize irritation.
Don’t Navigate Ankle Recovery Alone in Champaign
An ankle sprain is more than just an inconvenience; it’s a significant injury that requires a smart recovery plan. Without proper rehabilitation, you risk developing chronic ankle instability, which can plague you for years. A personalized plan from an expert is the fastest and safest way to return to the activities you love.
The team at IMPACT Physical Therapy & Sports Recovery is here to provide an expert diagnosis and a one-on-one treatment plan designed to restore your strength, stability, and confidence. Many people who search how to heal a sprained ankle or how long ankle sprains take to heal benefit from a physical therapy assessment early on.
Expert Ankle Care at IMPACT Can Help
Contact IMPACT Physical Therapy & Sports Recovery in Champaign, to schedule your evaluation and take the first real step toward a full recovery! Our clinicians can also demonstrate how to tape a sprained ankle in person if you need hands on guidance.
Important Disclaimer
This guide provides a general method for ankle taping and is intended for informational purposes only. It is not a substitute for professional medical advice, diagnosis, or treatment. Ankle taping should ideally be performed by or under the guidance of a qualified healthcare professional, such as a physical therapist or certified athletic trainer, especially after an injury like an ATFL sprain. Taping may not be appropriate for all stages of injury. If you are experiencing symptoms of pain or dysfunction consider scheduling an evaluation with a professional at IMPACT Physical Therapy & Sports Recovery for a personalized assessment and treatment plan. If you experience severe pain, swelling, numbness, or discoloration, seek immediate medical attention.


Frequently Asked Questions About Ankle Sprain Recovery in Champaign
1. Where can I get treatment for a sprained ankle in Champaign?
Our team can evaluate your ankle sprain and offer a custom recovery plan, including guided taping. You can visit IMPACT Physical Therapy & Sports Recovery in Champaign or several of our Chicagoland clinics for expert evaluation and treatment. Our physical therapists and athletic trainers provide hands-on care, personalized rehab programs, and guided ankle taping techniques to ensure a safe and fast recovery.
2. How long does it take for a sprained ankle to heal?
Mild sprains may improve in 1–2 weeks, while moderate to severe sprains can take several weeks to months. With proper rehab and care from an IMPACT physical therapist or athletic trainer, you can shorten recovery time and reduce the risk of re-injury.
3. Can I exercise with a taped ankle?
Yes, many Champaign athletes use taping during sports or workouts for added stability. However, you should always follow a physical therapist’s guidance to avoid further injury.
4. Do I need physical therapy for a mild ankle sprain?
Even mild sprains can weaken ligaments and increase your risk of future injury. A short course of physical therapy in Champaign can help restore balance, strength, and mobility, ensuring long-term ankle health.